How to generate a KSeF certificate
An up-to-date guide to the KSeF 2.0 Taxpayer Application: choosing a certificate purpose, generating the private .key file, downloading the .crt file, and securely preparing the complete set for use.

Article summary
As of June 6, 2026, you can generate a KSeF certificate in the KSeF 2.0 Taxpayer Application. After signing in, check the identifier used for authentication, open the Certificates tab, select Apply for a certificate, enter a name, set a password, and generate a local private key as a .key file.
Next, select one certificate purpose and a validity start date, then submit the application. When the process is complete, download the public certificate as a .crt file. The .key and .crt files serve different purposes, and you need the correct matching pair to use the certificate.
KSeF does not store the private .key file and cannot recover it. Before closing the form, confirm that the file has been downloaded, store the password securely, and create a controlled backup.
What do you need before generating a KSeF certificate?
A taxpayer or an authorized person may apply for a certificate. In the KSeF 2.0 Taxpayer Application, the user authenticates with an available sign-in method, such as a Trusted Profile signature, a qualified electronic signature, or a qualified electronic seal. A KSeF certificate is not used to sign in to the Taxpayer Application interface, but it can be used for authentication in properly integrated software that communicates with the API.
Before you begin, check both the context selected in the Taxpayer Application and the identifier contained in the authentication method you are using. The application data is obtained during sign-in, and the certificate will be issued for the owner's identifier. However, the company context and the scope of operations are not permanently stored in the certificate. When the certificate is later used, KSeF checks its owner's current permissions.
You should also prepare a secure location for the .key file and decide how the password will be stored. Do not leave this decision until the end of the process. The private key is created locally, and losing it means that you must obtain a new certificate.
| Before you begin | What to check |
|---|---|
| Access | Confirm that you can open the KSeF 2.0 Taxpayer Application and apply for a certificate. |
| Authentication | Confirm that you are using a supported sign-in method containing the expected identifier. |
| Context | Confirm that the correct KSeF context has been selected before starting the application. |
| Permissions | Confirm that the certificate owner has the permissions required for the intended operations. |
| Identifier | Determine whether the certificate should be issued for a NIP, PESEL, or qualified certificate fingerprint. |
| Secure storage | Decide where you will store the .key file, its backup, and the password. |
Key takeaways
A KSeF certificate is issued for the identifier obtained from the authentication method. This may be a NIP, PESEL, or the fingerprint of a qualified certificate if the signature or seal does not contain a tax identifier. The certificate does not grant permissions by itself and is not permanently assigned to one company context.
Type 1 and type 2 certificates have different uses and require separate applications. Type 1 is used for authentication, while type 2 is used to sign the issuer verification link in offline modes.
Saving the .key file is the most important moment in the process. You can download the public .crt certificate again, but neither the private key nor its password can be recovered from KSeF.
| Decision | What to check before confirming |
|---|---|
| Owner | The NIP, PESEL, or fingerprint obtained from the authentication method. |
| Purpose | KSeF authentication or signing the issuer verification link. |
| Complete file set | The private .key file, the .crt certificate, and a working password. |
| Business continuity | The expiry date, process owner, and planned certificate replacement date. |
Which KSeF certificate should you choose?
The application offers two certificate purposes. The first is Authentication in the KSeF system, which corresponds to a type 1 certificate. The second is Signing the issuer verification link, which corresponds to a type 2 certificate.
A single certificate cannot combine both purposes. This does not mean that every company needs two certificates. The choice depends on how the integration will authenticate and whether the company issues invoices in offline24 mode, during system unavailability, or during an outage.
Before submitting the application, check the documentation of the software that will use the certificate. The provider should clearly identify the required purpose. The terms type 1 and type 2 are useful in technical discussions, but in the form you should follow the full certificate purpose name.
| Option in the application | Type | Use | When to choose it |
|---|---|---|---|
| Authentication in the KSeF system | Type 1 | Authentication of interactive and batch sessions. | Choose this when the software should authenticate its KSeF connection with a certificate. |
| Signing the issuer verification link | Type 2 | Confirmation of the issuer's identity in offline24, system unavailability, and outage modes. | Choose this when the special-mode invoicing procedure requires the verification link or code to be signed. |
How do you generate a KSeF certificate in the Taxpayer Application?
1. Open the official KSeF 2.0 Taxpayer Application and start the sign-in process. Do not follow outdated instructions that direct you to the former Certificate and Permissions Module. January 25, 2026 was the last day applications could be submitted there, and a technical break took place from January 26 through January 31 before KSeF 2.0 was launched.
2. Authenticate with a supported sign-in method, such as a Trusted Profile signature, a qualified electronic signature, or a qualified electronic seal. You cannot use a KSeF certificate to sign in to the Taxpayer Application interface. Applying after certificate-based authentication is possible through the API in properly integrated software, but authentication with a KSeF token does not allow you to submit a certificate application.
3. Check the context and the owner's identifier. A method containing a PESEL results in a certificate issued for that identifier, while a method containing an entity's NIP results in a certificate containing that NIP. If a qualified signature or seal contains neither a NIP nor PESEL, the identifier may be the fingerprint of the qualified certificate. Subsequent access and the scope of operations depend on the certificate owner's current permissions.
4. Open the Certificates tab and select Apply for a certificate.
5. Enter a certificate name. It should contain between 5 and 100 characters and may include Polish letters, digits, spaces, a hyphen, and an underscore. KSeF_CompanyX_authentication_2026 is an example that can help organize your records, not a Ministry of Finance requirement.
6. Set and repeat the private key password. The password must contain between 15 and 32 characters, including a lowercase and uppercase letter without Polish diacritics, a digit, and at least one character from this set: !@#$%^&*()-_=+. The password cannot be reset later.
7. Select Generate. The browser will save the private key on your device as a .key file. Check the downloads folder immediately and make sure the file exists. Do not continue until you have confirmed it.
8. Select one certificate purpose: Authentication in the KSeF system or Signing the issuer verification link. If you need both functions, complete a separate process for each certificate.
9. Select the validity start date. A certificate may be valid for no more than 2 years, and its validity may begin in the future. When replacing a certificate, allow enough time to activate and test the new one before withdrawing the previous certificate.
10. Select Submit certificate application. Refresh the screen until processing is complete, then use the Download certificate option.
11. Check the complete set. It should include the local private .key file, the public PEM certificate with the .crt extension, and the saved password. The .crt file alone is not enough to use the certificate without the corresponding private key.
| Stage | Result | Control point |
|---|---|---|
| Authentication | Identity confirmed in KSeF. | Check the identifier of the future certificate owner. |
| Generation | Local private key saved as a .key file. | Confirm the download before submitting the application. |
| Application | Purpose and validity period selected. | Do not combine type 1 and type 2 uses. |
| Issuance | Public .crt certificate. | Download it after processing is complete. |
| Storage | Complete .key, .crt, and password set. | Create a backup and restrict access. |
What should you do with the .key and .crt files?
The .key file is not a certificate. It contains the private key generated locally in the browser and protected with the password you selected. Do not send it by email, place it in a shared directory without access controls, or provide it to anyone who is not responsible for the integration.
The .crt file is the public certificate in PEM format. You can download it again from the list of active certificates, but it cannot replace a lost .key file. The pair must come from the same generation process.
The safest approach is to keep the key in an encrypted store with restricted access, create a controlled backup, and store the password separately. Your internal procedure should identify the certificate owner, the system using the key, and the person responsible for replacing it before expiry.
| Item | What it contains | Can it be recovered? | How to protect it |
|---|---|---|---|
| .key | A private key generated locally. | No. KSeF does not store it. | Use encrypted storage, a backup, and restricted access. |
| .crt | A certificate containing the public key. | Yes, while the certificate is active. | Store it with information about its owner, purpose, and validity. |
| Password | Protection for the private key. | There is no password reset function. | Store it separately in a controlled password manager. |
How can you check whether the certificate is active?
The Certificates tab contains the list of issued certificates. The application distinguishes between active, blocked, revoked, and expired statuses. Simply possessing the .crt file does not confirm that the certificate can still be used.
On the list, check the purpose, owner identifier, valid from date, valid until date, and last used date. These fields help identify a certificate issued for the wrong identifier, an approaching expiry date, or a key that is no longer used.
You can download an active .crt file again. However, the list cannot restore the private .key file. If you no longer have it, downloading the public certificate will not restore your ability to authenticate or sign.
Common mistakes when generating a certificate
The most serious mistakes occur before you select Submit application. An incorrectly identified owner or the wrong purpose may result in a certificate that does not match its intended use. The context should be checked as part of your internal process before starting the application, but it is not permanently recorded as the certificate's operating scope.
The second group of mistakes concerns the files. A user downloads the .crt file but does not notice that the browser failed to save the .key file earlier. Downloading the public certificate again cannot fix this problem.
KSeF limits the number of certificates that may be issued, but you should not assume the current value based on old instructions or vendor materials. If the application reports that the limit has been reached, check the current limit and review unused certificates without guessing the number.
| Problem | Most common cause | What to do |
|---|---|---|
| The certificate has the wrong identifier | Nobody checked whether the owner would be identified by NIP, PESEL, or a qualified certificate fingerprint. | Stop before submission or obtain a new certificate for the correct identifier. |
| No access to the company context | The certificate owner does not have the required current permissions. | Check the owner's permissions in KSeF. The certificate itself does not grant access. |
| The certificate does not match its intended use | Type 1 was selected instead of type 2, or the other way around. | Obtain a separate certificate with the correct purpose. |
| The .key file is missing | The download was blocked or interrupted, or the file was deleted. | Apply for a new certificate. The private key cannot be recovered. |
| The password does not work | The password was recorded incorrectly or forgotten. | Apply for a new certificate because the password cannot be reset. |
| Only the .crt file is available | The local key protection step was overlooked. | Do not deploy an incomplete set. Generate a new matching pair. |
| The instructions show the former module | The material describes a route that stopped accepting applications after January 25, 2026. | Use the current KSeF 2.0 Taxpayer Application or the API. |
| The application reports a limit | The current certificate limit has been reached. | Check the current information in the system and review unused certificates. |
When should you revoke a KSeF certificate?
Revoke the certificate immediately if you suspect that the private key has been exposed, copied by an unauthorized person, or stored on a device or in a repository that is no longer under your control. Deleting the local file does not change the certificate's status in KSeF.
The application provides three revocation reasons: replacement with a new certificate, private key security compromise, and unspecified reason. Select the reason that reflects the actual situation and record the decision in your company's access register.
Certificates are revoked individually and only within the scope of your own certificates. After revocation, identify every system that used the old key and arrange a controlled replacement with a new set.
Checklist after generating the certificate
Complete every item before giving the files to an administrator or software provider. This review helps you identify an error while you still remember the application context and where the key was saved.
1. The certificate was issued for the correct owner identifier.
2. The correct purpose was selected: authentication or signing the issuer verification link.
3. The validity start and end dates match the deployment plan.
4. The .key file is stored in a secure repository.
5. The .crt file has been downloaded and assigned to the same set.
6. The password has been tested and stored separately.
7. A controlled backup of the key has been created.
8. Access is limited to designated people or systems.
9. The expiry date has been added to a calendar or register.
10. Certificate replacement has been planned before the validity period ends.
Explore KSeFGPT integrations
See how invoicing processes can connect with the tools you use, and review the security requirements of each integration before deployment.
View integrationsHow can you replace a certificate without interrupting operations?
Do not wait until the final day of validity. Record the owner, purpose, system using the key, expiry date, and person responsible for deploying its replacement in your certificate register.
Start early, generate a new set, and test it during a controlled maintenance window. The new and old certificates can operate in parallel for a planned period, allowing you to verify the configuration before withdrawing the previous key.
After switching, test authentication or verification link signing, monitor the first operations, and only then remove the old key from your systems. If the old key has been exposed, do not wait for the planned rotation. Revoke the certificate immediately.
| When | Action | Evidence |
|---|---|---|
| Before replacement | Assign an owner, set a date, and identify systems using the certificate. | Entry in the certificate register. |
| After issuance | Check the .key, .crt, and password set, then perform a controlled test. | Successful authentication or signature test. |
| After switching | Monitor the first operations and remove the old key from the configuration. | Confirmation that the new certificate works. |
| After an incident | Revoke the compromised certificate and replace the key immediately. | Revoked status in the certificate list. |
How do you add a certificate, private key, or token to KSeFGPT?
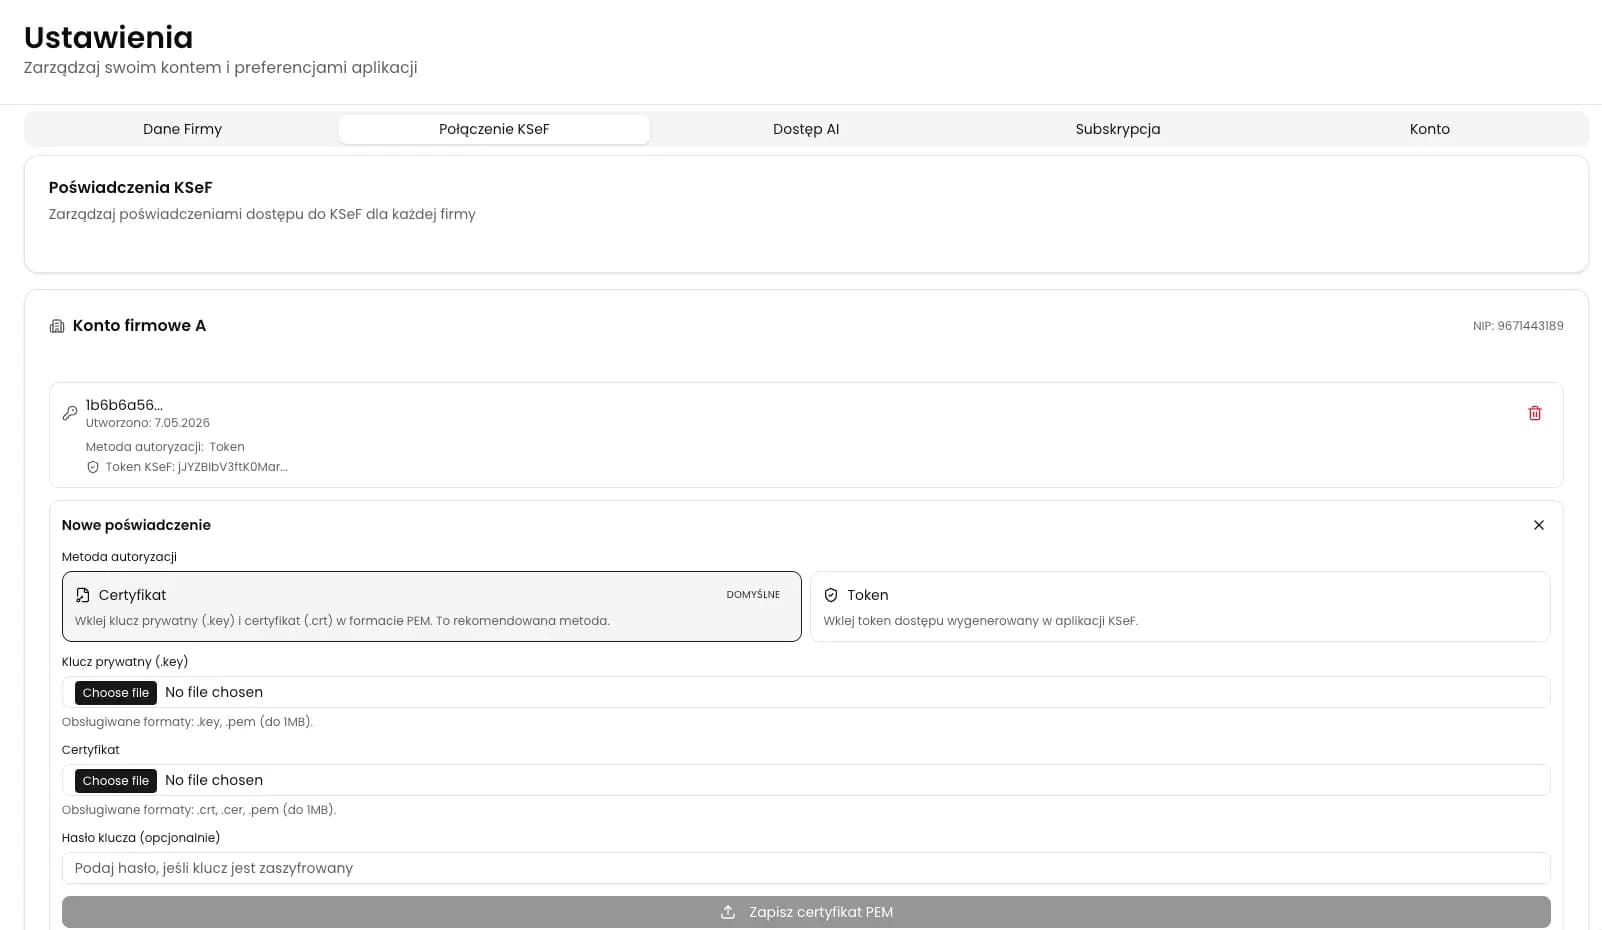
After creating a KSeFGPT account, you will see an onboarding flow for the initial setup. Add a company, then choose to connect it to KSeF. The system will redirect you to Settings, the KSeF Connection tab, and the KSeF Credentials section.
1. In Settings, open the KSeF Connection tab and find the KSeF Credentials section for the correct company.
2. To connect the company with a certificate, select the private key in .key or .pem format and its matching certificate in .crt, .cer, or .pem format. Both files must come from the same certificate generation process. If the key is encrypted, enter the password set when it was generated.
3. To use a token, select Token and enter a token generated in the correct company context with the permissions required for the planned operations.
4. Check the selected company and authentication method, then save the credential.
5. After the connection has been saved successfully, open the Invoices module. With certificate authentication, KSeF checks the certificate owner's current permissions. With a token, access depends on the context and permissions stored in the active token. If these requirements are met, you can retrieve and view the available invoices.
Do not send the certificate, private key, or token by email or instant messenger. Add them directly through the KSeF Credentials form in your account.
| Method | What you add in KSeFGPT | Where |
|---|---|---|
| KSeF certificate | A .key or .pem private key, a .crt, .cer, or .pem certificate, and the password if the key is encrypted. | Settings > KSeF Connection > KSeF Credentials |
| KSeF token | A token with the permissions required for the planned operations. | Settings > KSeF Connection > KSeF Credentials > Token |
Connect your company to KSeF
Create an account, add a company, and configure a certificate with its private key or a token in the KSeF Credentials section.
Open KSeFGPTFrequently asked questions
Where can I generate a KSeF certificate after February 1, 2026?
You can obtain a certificate in the KSeF 2.0 Taxpayer Application or through software that uses the KSeF 2.0 API. The former Certificate and Permissions Module accepted applications until the end of January 25, 2026, followed by a technical break before KSeF 2.0 was launched.
Can one certificate be used for both authentication and offline modes?
No. A certificate for KSeF authentication and a certificate for signing the issuer verification link have separate purposes. If a company needs both uses, it must obtain two separate certificates.
Can a lost .key file be recovered?
No. The private key is generated and saved locally on the user's device, and KSeF does not store it. You can download an active public .crt certificate again, but this will not restore the lost .key file.
How long is a KSeF certificate valid?
A KSeF certificate is valid for no more than 2 years from the selected start date, or from the issue date if no later start date is specified. The validity start date cannot be earlier than the application date.
Recommendation
If you are choosing an authentication method, read KSeF token or certificate? A practical authorization guide. Use it to compare the methods, then follow the current certificate procedure described in this article.
The next stages are covered in Sending invoices to KSeF: complete 2026 guide and UPO in KSeF: what is the Official Confirmation of Receipt?.
Before a wider rollout, you should also read The most common KSeF implementation challenges and how to overcome them.
Connect KSeFGPT to KSeF
Add a company, choose a certificate with its private key or a token, and connect to KSeF within the scope of the permissions you hold.
Create an accountSources
This article is based on official Ministry of Finance materials and KSeF 2.0 documentation reviewed on June 6, 2026.
- KSeF 2.0 Taxpayer Application user manual, version 2.3
Ministry of Finance · accessed: June 6, 2026
Official instructions covering the application process, private key generation, name and password requirements, purpose selection, certificate download, and certificate list management.
- KSeF certificates
Ministry of Finance · accessed: June 6, 2026
Official information about who may apply, type 1 and type 2 certificates, and the availability of the process in the Taxpayer Application and the KSeF 2.0 API.
- KSeF certificate issuance procedure, version 1.2
Ministry of Finance · accessed: June 6, 2026
The current procedure describing application channels, the owner identifier, certificate issuance stages, and the maximum validity period.
- KSeF 2.0 manual, part I: getting started with KSeF
Ministry of Finance · accessed: June 6, 2026
Material explaining why authentication certificates and certificates for signing the issuer verification link are separate.
- KSeF API 2.0
Ministry of Finance · accessed: June 6, 2026
Technical documentation confirming the certificate application rules and that an application cannot be submitted after authentication with a KSeF token.
- KSeF technical announcement of January 21, 2026
Ministry of Finance · accessed: June 6, 2026
The official schedule for the January 26-31, 2026 technical break and confirmation that January 25 was the last day applications could be submitted through the former module.
Expert reviewed: Bogdan Mazurek
Tax adviser · June 6, 2026
The content was reviewed for the current certificate issuance route, the distinction between type 1 and type 2, the roles of the .key and .crt files, and the correct response to a lost private key.
Related articles
New Invoice Notifications in KSeF
KSeF does not send an alert about a new invoice. See how KSeFGPT detects a new document and helps route it to the right person.
What is ViDA and how does it affect Polish businesses?
Understand ViDA's three pillars, the timeline through 2035 and what a Polish business can do now without implementing unsettled rules.
How to register for KSeF? Access, sign-in, permissions
There is no password-based KSeF account. Learn how authentication works, who gets automatic permissions, and when you need the ZAW-FA form.
How to create an invoice draft in KSeFGPT before sending it to KSeF
Save an invoice in progress as a draft or create one automatically from a PDF file. The document stays in KSeFGPT and is not sent to KSeF until you review and submit it yourself.